 Now Serving Canada

Ballast Weight for Freestanding Roof Guardrails (2026-2027): What Affects It + What to Ask For (Without Guessing Numbers)
If you’re shopping by ballast weight alone, you’re shopping blind. Ballast weight is not a one-size-fits-all number — it’s a site-specific engineering output. Facility managers often receive base weight specifications from vendors and assume those figures represent the total ballast needed. The truth is messier. Your roof’s wind exposure, corner configurations, access point layouts, and even toe board requirements all change what the system needs to stay secure. This guide explains the engineering inputs that determine ballast, what OSHA does and doesn’t specify, and provides a vendor-ready checklist for requesting site-specific calculations from EDGE Fall Protection so you stop guessing and start buying with confidence.
The Safe Way to Think About Ballast Weight
A freestanding guardrail’s base may weigh 200 pounds. That’s the base weight. It’s not the same as the required ballast for your installation. Corners need different support than straight runs. High-wind zones demand more counterweight. Roof setbacks change leverage. If a vendor quotes you a single number without asking about your roof plan, wind region, or access points, walk away.
OSHA sets guardrail criteria — height and strength. According to OSHA 1910.29, top rails must resist at least 200 pounds applied within 2 inches of the top edge. OSHA does not publish a required ballast weight for freestanding roof guardrails; it requires guardrail performance (height and strength), while ballast is determined by site-specific engineering such as wind loads, roof conditions, and system geometry. That engineering uses standards like ASCE 7 for wind pressures, your building height, and the layout you actually install.
Here’s the no-guessing approach: First, define your roof (membrane type, parapets, roof slope) and identify all hazard zones and access points. Second, choose a system style that fits those constraints (freestanding, parapet clamp, standing seam clamp, or warning line where permitted). Third, request documented engineering from the vendor — a site-specific layout drawing, wind design basis, roof load check, and installation documentation. If they won’t provide those, you’re being asked to assume the risk.
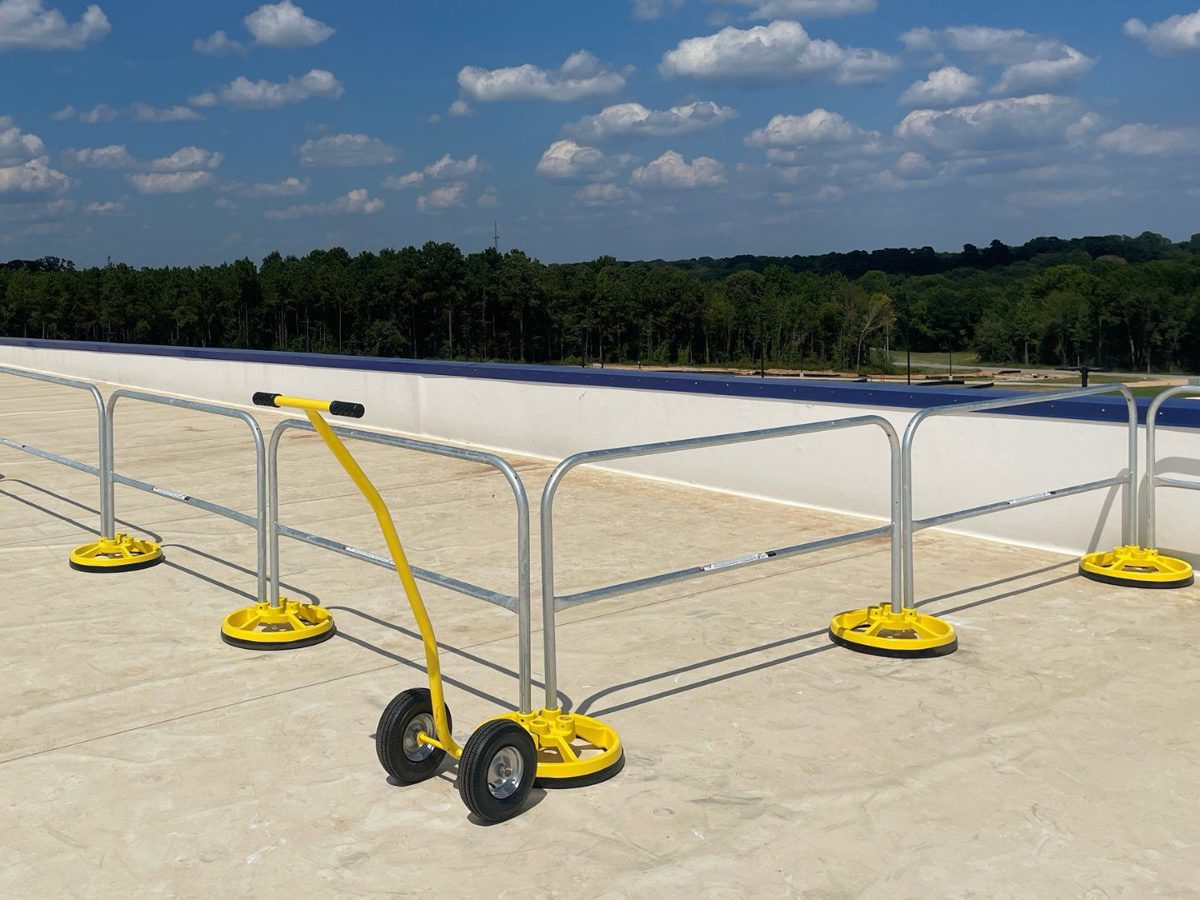
The 360 Mobile Safety Rail is a proven non-penetrating system. EDGE provides the engineered documentation buyers need — not guesses. Ballast weight is the counterweight a freestanding guardrail uses to resist sliding and overturning forces (especially wind and worker loads) without roof penetrations. Every installation is different.
What Is a Non-Penetrating (Freestanding) Roof Guardrail System?
A non-penetrating roof guardrail is a fall protection barrier that achieves required strength without drilling into the roof membrane, typically using counterweighted bases and modular rails. These systems protect workers at roof edges, leading edges, skylights, roof hatches, and ladder landings. They’re popular on commercial membrane roofs because they protect workers without puncturing the roof and threatening warranty coverage.
Non-penetrating guardrails differ from parapet-clamp systems (which grip parapet walls) and standing-seam clamp systems (which attach to metal roof seams). All three are “low/no penetration,” but the load paths differ. Freestanding guardrails rely on ballast and friction. Clamp systems transfer loads to existing structural elements. The right choice depends on what your roof offers and what your warranty allows.
These systems provide passive protection. Once installed correctly, they don’t require workers to remember to clip in or adjust rigging. That reduces reliance on behavior and training consistency, though training remains important. Falls from elevation are a major fatal hazard in construction. NIOSH notes falls from elevation represented approximately 81% of fatal slips, trips, and falls in 2022. Passive barriers remove some of that risk before a worker even steps onto the roof.
| Term | Plain-English Meaning |
|---|---|
| Ballast | Counterweight (concrete blocks, steel plates, or integrated cast bases) that keeps the guardrail from tipping or sliding. |
| Counterweight | Same as ballast — added mass to resist forces. |
| Outrigger/Kicker | Extended base arm or foot that spreads load and increases tipping resistance at corners or ends. |
| Wind Zone | Roof areas with different wind pressures (field, edge, corner); corners see higher pressures. |
| Setback | Distance the guardrail is installed inboard from the roof edge; affects wind exposure and leverage. |
| Parapet | Low wall at roof edge; can serve as intermediate protection or mounting point for clamp systems. |
| Designated Area | Area of a walking-working surface delineated by a warning line, where employees may perform work without additional fall protection; on roofs, limited to low-slope roofs under specific conditions (OSHA 1910.21(b) and 1910.28(b)(13)). |
For broader context on when and why non-penetrating guardrails fit into a fall protection program, see EDGE’s planning resources.
How Does a Non-Penetrating Guardrail Stay Secure Without Anchors?
A non-penetrating roof guardrail stays in place through counterweight (ballast), friction/roof interface protection pads, and a base-and-rail geometry that resists overturning — then it is verified by testing or engineering calculations for the specific layout and wind conditions. Three forces matter: sliding (horizontal movement across the roof), overturning (tipping about the base edge), and racking (lateral sway). The system must resist all three.
Counterweight (ballast) resists uplift and overturning. Wind pushes on the rail. That creates a moment about the base. Ballast on the opposite side of the fulcrum counters that moment. The heavier the base or the farther it extends from the tipping point, the more stable the system. Rail height creates leverage against you — a 42-inch rail amplifies forces compared to a shorter barrier. Wind can also create uplift (negative pressure on the roof surface), trying to lift the base. Ballast holds it down.
Friction and roof interface prevent sliding. Pads protect the membrane (TPO, PVC, EPDM, or modified bitumen) and contribute slip resistance. Roof condition matters. Wet, icy, or dusty surfaces reduce friction. Some designs account for worst-case conditions (wet membrane). Others assume dry conditions and require inspection after weather events. Always ask what the vendor’s friction assumptions are.
System geometry distributes forces and increases stability. A wide base footprint increases both sliding resistance and overturning resistance. Corner and termination conditions often need outriggers or kickers — extended arms that spread the load and lower the center of gravity. A straight-run midpoint base might work with one configuration, but the same base at a 90-degree corner might tip without additional support. Gates and access points create discontinuities that change load paths.
Verification ties it together. Some systems rely on third-party testing (a lab test of the standard configuration under defined loads and wind pressures). Others use project-specific calculations based on ASCE 7 wind loads for your building height, exposure category, and roof layout. The calculations account for actual wind pressures at the edge and corner zones, the rail height, any toe boards or screens (which increase wind sail area), and the base layout you’ll install. If the vendor can’t show you test results or stamped calculations, you’re guessing.
| Force Type | What It Tries to Do | Design Response |
|---|---|---|
| Wind (horizontal pressure) | Slide the base across the roof or tip it over | Ballast weight, base footprint, pads with friction, outriggers at corners |
| Worker load (top rail impact) | Rack the system or create overturning moment | Rail connections (locking pins), base geometry, ballast distribution |
| Uplift (negative wind pressure) | Lift the base off the roof | Ballast weight, base footprint area |
| Incidental impact (cart, tool drop) | Displace or damage components | Robust rail-to-base connections, protected locking mechanisms |
A non-penetrating guardrail stays secure by resisting both sliding and overturning — so the base layout matters as much as the base weight. Corners, ends, and access points change the stability equation. The non-penetrating roof railing system from EDGE uses documented base layouts and geometry to handle those variations. OSHA strength criterion: top rail must withstand at least 200 pounds applied within 2 inches of the top edge per 1910.29 and 1926.502.
OSHA Compliance in 2027: What OSHA Requires (and What It Doesn’t)
OSHA compliance is about performance, not a universal base weight. Two OSHA standards govern guardrails: 1910.29 (general industry) and 1926.502 (construction). Both specify what the guardrail must do — height, strength, intermediate protection — but neither tells you how much ballast your specific roof and wind conditions require. That’s engineering.
General Industry (1910.29): Top rail height must be 42 inches, plus or minus 3 inches, from the walking-working surface. When there’s no parapet wall at least 21 inches high, you need intermediate protection (a midrail, screen, or mesh) with openings no larger than 19 inches. The top rail must withstand at least 200 pounds applied in any outward or downward direction within 2 inches of the top edge. Midrails must withstand at least 150 pounds. OSHA 1910.29 also addresses toe boards when needed for falling object protection.
Construction (1926.502): Guardrail criteria mirror general industry. Top rail 42 inches (plus or minus 3 inches). Midrail or equivalent intermediate protection. Top rail strength of 200 pounds. These requirements apply during construction work, including new builds, renovations, and contractor-managed roof work. OSHA 1926.502 governs the work, while 1910.29 often governs ongoing facility maintenance after the contractor leaves.
Toe boards: Required when tools, materials, or equipment could fall to areas where workers are present below. Minimum 3.5-inch vertical height from the walking-working surface. They must withstand at least 50 pounds applied in any downward or outward direction. Toe board criteria under 1910.29(k) apply when the falling object hazard exists.
What OSHA doesn’t provide: A ballast number. OSHA tells you the guardrail must resist 200 pounds at the top rail and stand 42 inches tall. It doesn’t say “use 250 pounds of ballast per base” because ballast depends on wind speed, exposure, building height, corner vs. straight-run placement, and roof conditions (slope, friction, wet vs. dry). Engineering fills that gap.
Practical tip: Clarify which standard applies to your work. Facility maintenance crews typically work under 1910. Contractors installing a new HVAC unit often work under 1926. If your scope includes both, document which standard governs which phase and ensure your guardrail system meets the stricter requirement. OSHA’s construction fall protection standard remains a top-cited standard with 5,914 violations reported (FY 2025), reinforcing the need for rigorous compliance planning.
OSHA tells you how strong and how tall the guardrail must be; engineering tells you how much ballast your specific roof and wind conditions require. An OSHA-compliant guardrail is a barrier that meets OSHA’s required height and strength criteria (including 200-lb top rail load capacity) and includes required intermediate protection such as a midrail when there is no parapet. For deeper interpretation and related rules, see EDGE’s guide to OSHA guardrail requirements.
| OSHA Requires | OSHA Does Not Specify |
|---|---|
| Top rail height: 42 inches ±3 inches | Ballast weight for freestanding systems |
| Top rail strength: ≥200 lb load capacity | Wind design method (ASCE 7 or other) |
| Intermediate protection when no 21-inch parapet exists | Base footprint dimensions |
| Midrail or mesh with ≤19-inch openings | Required setback distance from edge |
| Toe boards ≥3.5 inches when falling object risk exists | Roof load capacity verification method |
| Toe board strength: ≥50 lb capacity | Specific friction coefficient assumptions |
What Affects Ballast Weight? The Engineering Inputs (Not Guesswork)
Ballast is calculated from forces — so start by listing the forces and constraints. If your roof has corners, access gates, toe boards, or a high-wind exposure, your ballast layout may differ from a simple straight-run perimeter. Engineering inputs drive the ballast calculation. Give these to your vendor or engineer, and you’ll get a real answer instead of a guess.
Wind design basis (ASCE 7): Wind pressures vary by exposure category (B, C, or D), building height, and topographic effects (hilltop, escarpment). Roof perimeters see higher pressures than the field. Corners see higher pressures than edges. A roof in a coastal high-wind zone with Exposure D will demand more ballast than the same guardrail on a suburban office building in a moderate wind zone. ASCE 7 provides the calculation framework. Ask the vendor which edition of ASCE 7 they used and what wind speed and exposure they assumed.
Setback distance: Moving the rail inboard from the edge changes leverage and wind exposure. A guardrail 6 feet from the edge experiences different wind pressures than one at the edge. Setbacks also affect fall clearance and may change whether you can use a designated area approach. Farther setbacks can reduce wind loads but increase the roof area left unprotected unless you add warning lines or other measures.
Parapets: A parapet wall at least 21 inches high changes OSHA’s intermediate protection requirement — you may not need a midrail. Parapets can also reduce wind on the rail (the wall blocks some flow) and may enable parapet-clamp guardrails instead of freestanding ballast. Continuous parapets simplify layouts. Gaps in parapets (for drains or access) create weak points that need special attention.
Roof slope and drainage: Low-slope roofs (4:12 pitch or less) are the norm for commercial work, but even 1:12 or 2:12 slopes create drainage flow and ponding areas. Wet or icy surfaces reduce friction. Some designs account for wet conditions; others assume dry. Confirm the vendor’s assumption. Roof slope also affects whether OSHA allows certain fall protection methods (designated areas are limited to low-slope roofs).
System configuration: Straight runs, corners, ends, and terminations all behave differently. A corner post sees wind from two directions. An end termination has no rail beyond it to share load. Gates create openings where workers pass through — those need self-closing mechanisms and may need reinforced posts. Toe boards, screens, or signage increase wind sail area. Adding a 4-inch toe board along 100 feet of rail adds significant wind catch. Include it in the design basis.
Occupancy and use: Permanent maintenance access (weekly or monthly HVAC service) justifies a permanent guardrail. Temporary construction activity may allow temporary systems. Frequency of access affects inspection schedules and documentation needs. High-traffic access points (daily use) need durable gate hardware and clear procedures.
Wind zone (field/edge/corner) refers to how wind pressures vary across a roof: corners and edges generally experience higher pressures than the interior field, which can drive different guardrail base layouts. NIOSH reports that fall protection use was 71% lower for workers whose employer did not do any planning. Documenting these inputs isn’t paperwork — it’s the foundation of a safe system.
| Input | Why It Matters | What to Provide the Vendor |
|---|---|---|
| Building height | Taller buildings see higher wind speeds | Roof elevation above grade in feet |
| Wind region / speed | Design wind speed (mph) per ASCE 7 or local code | Project address or wind zone map reference |
| Exposure category | Suburban (B), open terrain (C), or unobstructed/shoreline (D) changes pressures | Site photos showing surrounding obstructions |
| Roof edge vs. field | Edge and corner zones see pressure multipliers | Layout plan showing guardrail placement zones |
| Setback distance | Changes leverage and exposure; affects fall clearance | Dimension from edge to rail centerline |
| Parapet height/continuity | Affects intermediate protection requirement and wind shielding | Parapet height, gaps, and construction type |
| Roof slope | Affects drainage, friction, and OSHA applicability | Roof pitch (e.g., 1:12, flat, 2:12) |
| Roof membrane type | Friction coefficient varies; some membranes need special pads | TPO, PVC, EPDM, modified bitumen, BUR, etc. |
| Access points (hatches, ladders) | Gates and openings change structural continuity | Location and size of each access point |
| Corners and terminations | Higher forces; may need outriggers or kickers | Number of corners, L-shapes, or dead-ends |
| Toe boards or screens | Increases wind sail area significantly | Toe board height and length; screen mesh or solid panel |
| Roof load capacity | Limits how much ballast the roof can support | Structural drawings or roof load rating (psf) |
For decision-making logic that ties these inputs to system selection, see EDGE’s guardrail selection guide.
Roof Constraints That Can Make (or Break) a Ballasted Guardrail Design
Before you ask “how much ballast,” confirm “how much roof can carry.” Non-penetrating doesn’t mean “no roof impact” — it means the system avoids fasteners, so you still must confirm roof load capacity and membrane protection. Ballast is dead load. Bases concentrate that load over a small footprint. Your roof must support it.
Structural capacity: Roofs are designed for a certain live load (snow, workers, equipment) and dead load (roofing materials, permanent fixtures). Adding guardrails increases dead load. A 200-pound base spread over 2 square feet applies 100 pounds per square foot (psf) at that point. If your roof is rated for 30 psf total dead load and already carries 20 psf of roofing and HVAC, you have 10 psf margin. That base exceeds it. You need to verify capacity with a structural engineer or spread the load (larger base footprints, load-distributing pads).
Point load is the concentrated load applied to a small area of the roof (such as under a guardrail base), which can matter even when the overall roof load seems acceptable. Membrane compression is another concern. Heavy bases can compress insulation or crush lightweight concrete decks over time. Protective pads distribute load and protect the membrane, but they don’t eliminate structural limits.
Roof type: Single-ply membranes (TPO, PVC, EPDM) are common on commercial low-slope roofs. They’re durable but can be punctured or abraded. Built-up roofing (BUR) and modified bitumen are thicker and more resistant to abrasion but still need pads to prevent damage. Metal roofs (standing seam) enable clamp systems and typically have higher structural capacity than membrane assemblies.
Warranty coordination: Document that the chosen method avoids penetrations. Some roof warranties void if you drill through the membrane. Non-penetrating guardrails preserve the warranty, but you should notify the roof manufacturer or roofing contractor of the planned system and confirm that pads and ballast won’t void coverage. Get written confirmation if possible. Include it in your project file.
Maintenance realities: Ice, ponding water, debris, and algae growth all affect friction and inspection needs. A base sitting in a puddle loses friction. Ice under a base can lift it or create slip conditions. Plan drainage away from guardrail bases. Inspect after snow melt or heavy rain. Clean debris from pads and check for membrane damage annually.
When to pivot to a different style: If roof load is limited and ballast exceeds capacity, consider parapet clamp systems (which transfer load to the parapet wall instead of the roof deck), standing seam clamps (for metal roofs), or a designated area/warning line approach when permitted by OSHA for your job scope. Designated areas have strict rules. In general industry, a designated area on a low-slope roof can be used for work performed at least 6 feet from the roof edge, and work within 15 feet of the edge qualifies only when it is both infrequent and temporary. The warning line must be at least 6 feet from the roof edge for work that is both temporary and infrequent, or at least 15 feet for other work (OSHA 1910.28(b)(13) and 1910.29(d)). Don’t overpromise what warning lines can do; they’re not a universal substitute for guardrails. For spacing requirements and when warning lines are appropriate, see EDGE’s guide to warning line spacing.
Fatal falls, slips, and trips accounted for 370 of the 1,032 fatalities among construction and extraction workers in 2024 (U.S. Bureau of Labor Statistics, National Census of Fatal Occupational Injuries in 2024, February 19, 2026). Selecting the right system isn’t just a compliance checkbox — it’s a business risk decision.
| Roof Constraint | What to Verify | Who Should Sign Off |
|---|---|---|
| Roof structural capacity (dead load) | Load rating (psf) and available margin | Structural engineer or architect of record |
| Point load limits | Maximum concentrated load per base footprint | Structural engineer |
| Membrane type and condition | Age, existing damage, seam integrity | Roofing contractor or roof consultant |
| Roof warranty terms | Penetration restrictions, load restrictions, required notices | Roof manufacturer or warranty holder |
| Drainage and ponding areas | Low spots, drain locations, typical ponding duration | Facility manager or roofing contractor |
| Existing roof loads (HVAC, solar, equipment) | Weight and footprint of all permanent fixtures | Facility manager or MEP engineer |
| Parapet or edge conditions | Parapet height, continuity, attachment method | Structural engineer or architect |
Configuration Details That Change Ballast Needs (Corners, Ends, Gates, Toe Boards)
Corners, ends, and access gates are the most common reasons a freestanding guardrail needs a different ballast layout than a straight run. Here are the six details buyers forget to mention when requesting quotes — and then discover during installation that the standard base won’t work.
1. Corners and terminations: A 90-degree corner post receives wind from two faces. The leverage changes. An end termination (a guardrail dead-end where the run stops) has no rail beyond it to distribute load, so the end post must resist the full overturning moment alone. Outriggers or kickers — extended base arms that increase footprint and lower center of gravity — are common solutions. Some systems use heavier end bases. Others use guy wires or supplementary anchors. Ask the vendor how corners and ends are handled.
2. Roof hatches and fixed ladders: Access points need openings. Roof hatches typically require D-shaped or U-shaped rails around the opening, with a gate on one side. Fixed ladders need a gate or swing gate where workers step onto the roof. In general industry, gates at access openings must be self-closing and swing or slide away from the hole (OSHA 1910.29(b)(13)). The posts supporting gates see repeated impact loads (workers pushing through). Reinforce gate posts with heavier bases or outriggers. For hatch-specific solutions, see EDGE’s roof hatch guardrail systems.
3. Toe boards and falling object protection: Toe boards are required when tools or materials could fall to workers below. OSHA specifies toe board minimum vertical height of 3.5 inches and at least 50 pounds strength. A toe board is a low barrier at the base of a guardrail used to reduce the risk of tools or materials falling to a lower level; OSHA specifies minimum height and strength criteria. Adding toe boards increases wind sail area. A 4-inch solid toe board along 100 feet of rail can significantly increase the wind force on the system. Include toe boards in the wind design basis or you’ll discover after installation that the bases aren’t heavy enough. For detailed guidance, see toe board requirements.
4. Skylights: Skylights are fall-through hazards. Older skylights (plastic domes, fiberglass panels) can crack and fail under worker weight. OSHA requires protection: a cover or a guardrail around the skylight, or a personal fall arrest system (OSHA 1910.28(b)(3) and 1926.501(b)(4)). Covers must support at least twice the weight of the employees, equipment, and materials that may be imposed on them at one time (OSHA 1910.29(e) and 1926.502(i)). Guardrails around skylights create odd geometries (rectangles, small perimeters) that need careful layout. Corners multiply. For skylight protection strategies, see EDGE’s skylight fall protection page.
5. Material staging areas: If workers stage tools, materials, or equipment near roof edges, plan for toe boards or mesh screening to contain falling objects. Staging areas also create congestion — workers move around the guardrail, bump into it, and apply incidental loads. Design for those impacts.
6. Signage and attachments: Some sites attach safety signage, tool hooks, or temporary shelters to guardrails. Every attachment adds wind catch or point load. If you plan to hang anything on the rail, tell the vendor so they can account for it.
| Feature | Do You Have It? | What to Measure | What Accessory May Be Needed |
|---|---|---|---|
| 90-degree corners | Yes / No | Number of corners and angle (90°, 45°, etc.) | Outrigger bases, corner kits, heavier ballast |
| End terminations (dead-ends) | Yes / No | Number of terminations and clearance available | End outriggers, kicker feet, or guy supports |
| Roof hatches | Yes / No | Hatch size (e.g., 30"×30"), swing direction, curb height | D-rail or U-rail section, self-closing gate |
| Fixed ladders | Yes / No | Ladder width, cage or no cage, landing size | Swing gate or pivot gate with latch |
| Skylights | Yes / No | Skylight dimensions and number of units | Perimeter guardrail or skylight screen/cover |
| Toe boards needed | Yes / No | Length of toe board run and height required | Toe board panels, brackets, increased ballast |
| Material staging zones | Yes / No | Area size and typical load (tools, pallets, etc.) | Screening, reinforced posts, load ratings |
What to Ask For in 2026-2027: The “No-Guess” Ballast Submittal Package
If you want ballast without guessing, ask for documents — not promises. A vendor-ready ballast request includes the wind design basis, a site-specific layout drawing, and documentation showing the system meets OSHA guardrail performance criteria. Here’s the submittal package checklist. Send this to purchasing, contractors, and the vendor. EDGE aims to be the easiest vendor to work with by helping you know exactly what you need up front.
1. Design basis: Written statement of the wind design method (ASCE 7 edition and section), assumed wind speed, exposure category, and building height. Example: “Design per ASCE 7-22, 115 mph 3-second gust wind speed, Exposure C, 40-foot building height.” The design basis should also state roof slope, membrane type, and friction assumptions (wet or dry conditions). This document is the foundation of the entire calculation. Without it, you can’t verify the vendor’s work or compare vendors on equal footing.
2. Site-specific layout drawing: Plan view showing the guardrail path, base spacing, corner treatments, gate locations, and setback dimensions. The drawing should identify wind zones (field, edge, corner) and call out different base configurations if corners or ends need outriggers. Include dimensions from the edge, from building features (HVAC units, parapets), and between bases. This drawing becomes your installation guide and inspection reference.
3. Roof load documentation: Total system weight (bases plus rails) and how loads are distributed. Request a table showing base weight, base footprint area, and resulting point load (psf). If the roof has load limits, ask the vendor to confirm the system is within capacity or recommend load-distributing pads. You may need your structural engineer to review and sign off. If the vendor can’t provide this, you’re left to guess whether the roof can handle it.
4. Compliance statement: Written confirmation that the system meets OSHA 1910.29 and/or 1926.502 criteria — top rail height (42 inches ±3 inches), top rail strength (≥200 lb), intermediate protection (midrail or equivalent when no parapet exists), and toe board criteria if applicable. Some jurisdictions or contracts require a PE stamp (professional engineer seal). Ask if one is needed for your project and whether the vendor provides it as part of the quote or as an additional service.
5. Installation manual and inspection checklist: Step-by-step assembly instructions, required components list, torque specifications (if applicable), and a periodic inspection checklist. The manual should specify what to check before first use, after severe weather (high wind, snow load, ice), and at regular intervals (monthly, quarterly). What are the pass/fail criteria? What do you do if a component fails? Who do you call for replacement parts?
6. Warranty coordination note: Written statement that no roof penetrations are required for the specified configuration and any pad requirements to protect the membrane. If your roof warranty has special conditions (notification to manufacturer, approved products list), confirm the vendor’s pads or bases comply. Get this in writing so you can include it in warranty documentation.
7. Closeout deliverables: As-built layout (showing where the system was actually installed, including any field changes), training sign-off sheet (who was trained, when, and by whom), and maintenance plan (inspection frequency, responsible party, record-keeping). These documents prove compliance during OSHA inspections and insurance audits.
Design basis is the documented set of assumptions and codes used to size and configure the guardrail system (including wind loading method and roof conditions). A CPWR survey, cited by NIOSH, found that approximately 49% of respondents said no fall protection was being used at the time of the fall. Better planning and documentation improve use rates. For more about EDGE’s capability to support documentation, drawings, and compliance guidance, visit about EDGE.
| Required Item | Why It Matters | Who Provides It | What "Good" Looks Like |
|---|---|---|---|
| Wind design basis | Proves ballast is site-specific, not guessed | Vendor or vendor's engineer | Stated ASCE 7 reference, wind speed, exposure, building height |
| Site-specific layout drawing | Shows exact base placement, corners, gates, zones | Vendor | Dimensioned plan view with base spacing and wind zone callouts |
| Roof load documentation | Confirms roof can support ballast without damage | Vendor (with owner's engineer review) | Table of base weights, footprints, and resulting psf; load-distributing pad specs if needed |
| OSHA compliance statement | Confirms height, strength, and intermediate protection criteria | Vendor | Written statement citing 1910.29 or 1926.502 and confirming all criteria met |
| PE stamp (when required) | Required by some jurisdictions or contracts for structural adequacy | Vendor's engineer or owner's engineer | Sealed and signed calculations or drawings by licensed PE |
| Installation manual | Ensures correct assembly and component use | Vendor | Step-by-step instructions with photos/diagrams; parts list; torque specs if applicable |
| Inspection checklist | Defines what to check and when; creates compliance record | Vendor | Frequency (after weather, monthly, etc.); pass/fail criteria; corrective actions |
| Warranty coordination note | Protects roof warranty by confirming no-penetration method and pad compatibility | Vendor (with input from roofer/manufacturer) | Written statement that system avoids penetrations; pad material and installation specified |
| As-built layout | Documents what was installed; reference for future changes or inspections | Installer or vendor | Marked-up plan showing actual base locations and any field modifications |
| Training sign-off | Proves workers were instructed on use, gates, inspection | Trainer (vendor or owner's safety lead) | Attendee list, date, topics covered, trainer signature |
Which System Style Should You Choose? (Freestanding vs Parapet Clamp vs Standing Seam vs Warning Line)
If you can’t penetrate a membrane roof, start with a freestanding non-penetrating guardrail — then validate roof capacity and request a documented wind/ballast design from the manufacturer. Not every roof fits the same solution. Here’s a decision tree and comparison matrix to aid your product selection process.
Decision tree: Can you penetrate the roof? If no, proceed to non-penetrating options. Do you have a parapet or standing seams? If yes, consider clamp paths. If roof load is limited, clamp systems or alternative fall protection may be required. If no parapet or seams exist, freestanding ballasted guardrails are the default — confirm roof capacity and request wind/ballast engineering.
Freestanding ballasted guardrail: Best for membrane roofs with no penetrations allowed. Fast installation (no drilling, no roof contractor coordination beyond pads). Ballast must be engineered for your wind, roof slope, and layout. Advantages: preserves warranty, relocatable, no structural penetrations. Disadvantages: requires roof load capacity, ballast adds weight, and corners/ends need special attention. Typical use: commercial low-slope roofs with TPO/PVC/EPDM membranes.
Parapet clamp systems: Clamp to the parapet wall, transferring load to the parapet instead of the roof deck. Can reduce roof loading because the wall becomes the structural element. Parapet must be evaluated for strength (masonry, concrete, CMU, metal stud). Advantages: lower roof loading than ballast, no drilling through membrane. Disadvantages: requires suitable parapet (height, strength, access), not universal. Typical use: roofs with continuous parapets 9 in. minimum in height above the finished roof surface. Clamp feet shall bear on parapet surfaces and not on membrane base flashing; where flashing extends into the clamp bearing zone, confirm with EDGE engineering. Parapet strength shall be verified by a qualified engineer. See EDGE’s parapet clamp railing.
Standing seam metal roof clamp systems: Clamp to the raised seams of a metal roof, avoiding penetrations. Load transfers through seam attachment. Confirm compatibility with your seam profile and spacing. Consult the metal roof manufacturer to ensure clamps won’t void roof warranty. Advantages: no penetrations, uses existing structural geometry, fast install. Disadvantages: only works on standing seam roofs, seam spacing and profile must match clamp design. Typical use: industrial and warehouse metal roofs. See EDGE’s metal roof guardrail.
Warning lines and designated areas: In general industry, OSHA allows designated areas on low-slope roofs where workers can work at least 6 feet from the roof edge without additional fall protection, but work within 15 feet of the edge qualifies only when it is both infrequent and temporary. The warning line must be installed at least 6 feet from the roof edge for work that is both temporary and infrequent, or at least 15 feet for other work, and workers must stay within the designated area while work is underway (OSHA 1910.28(b)(13) and 1910.29(d)). In construction, warning lines are used in combination with guardrail, safety net, personal fall arrest, or safety monitoring systems (OSHA 1926.501(b)(10) and 1926.502(f)). Warning lines are not a universal substitute for guardrails. They require strict policy enforcement and are limited to specific work scenarios. Use only when your work scope permits and train workers on the restrictions. For spacing requirements, see EDGE’s perimeter warning lines.
Active systems (restraint/arrest): Personal fall arrest systems (PFAS) and restraint systems rely on harnesses, lanyards, anchors, and worker compliance. They’re alternatives when guardrails are not feasible (e.g., leading edge work, temporary access). This article focuses on guardrails, but active systems deserve mention as a fallback. They demand rigorous training, anchor certification, and rescue planning.
| System Style | Roof Impact | Warranty Risk | Speed of Install | Best Roof Types | Documentation to Request | EDGE Solution |
|---|---|---|---|---|---|---|
| Freestanding ballasted guardrail | Adds dead load; needs capacity check | Low (no penetrations) | Fast (no drilling) | Membrane (TPO, PVC, EPDM) | Wind design basis, layout, roof load check | 360 Mobile Safety Rail, AccuFit |
| Parapet clamp | Transfers load to parapet; minimal roof load | Low (no membrane penetrations) | Moderate (parapet prep) | Roofs with continuous parapets 9 in. minimum in height above the finished roof surface. Clamp feet shall bear on sound parapet surfaces, not on membrane base flashing | Parapet strength verification, layout, clamp torque specs | Parapet Wall Clamping Rail |
| Standing seam clamp | Minimal (clamps to seams) | Low (confirm with roof manufacturer) | Fast (clamp and tighten) | Metal standing seam roofs | Seam profile compatibility, manufacturer approval, layout | Metal Roof Guardrail |
| Warning line / designated area | Minimal (light poles and line) | None (no load) | Very fast | Low-slope roofs only; restricted tasks per OSHA 1910.28(b)(13) | Policy/training documentation, spacing verification per 1910/1926 | EnduraLine Warning Lines |
| Active fall arrest/restraint | Anchor points only | Depends on anchor method | Varies (anchor install) | Any roof with suitable anchorage | Anchor testing/certification, rescue plan, training records | Ranger System, Tether Track, Rigid Rail |
OSHA fall protection violations remain high (FY 2025: 5,914), justifying investment in passive, reliable solutions where feasible.
Example Scenario: Distribution Facility With a Membrane Roof + Multiple Access Points (How to Spec It)
You manage facilities for a distribution company. Your roof is a single-ply membrane (TPO). You cannot puncture it without voiding the warranty. Workers access the roof weekly through three points: a main roof hatch near the center, a fixed ladder at the west side, and a second hatch at the east mechanical area. You need OSHA-compliant fall protection for perimeter edges and access zones. What system style and ballast weight should you look for in 2027?
System style recommendation: Start with a freestanding non-penetrating guardrail as the baseline solution. It preserves the membrane warranty and installs quickly. Evaluate parapet clamp only if a parapet exists and is verified for strength. Integrate hatch/ladder solutions at access points — self-closing gates at each hatch and ladder landing. Do not assume a single ballast number will work for all three zones; corners, gates, and wind exposure vary.
Information to gather: Roof type (confirm TPO thickness and manufacturer), roof plan or drawing showing building dimensions and hatch/ladder locations, building height above grade, whether parapets exist and their height, areas of routine work (HVAC zones, skylights if any), and any known roof load constraints. Take photos of each access point showing curb heights, swing clearances, and obstructions.
What to request from EDGE: Site-specific layout drawing showing guardrail paths around the perimeter and at each access point, with base spacing called out. Wind/ballast design basis per ASCE 7 (include your building address or wind zone). OSHA compliance statement confirming 42-inch height, 200-lb top rail strength, intermediate protection (midrails), and self-closing gates at access points. Optional toe boards if you stage tools or materials near edges (risk of falling objects to ground level). Roof load check showing base weights and footprints — confirm your roof can support the system or specify load-distributing pads.
Implementation plan: Install perimeter guardrails first (continuous protection). Phase in access point gates during scheduled maintenance windows (coordinate with operations to minimize roof access interruptions). Inspect pads and membrane after first install to confirm no damage. Train maintenance staff on gate operation (self-closing, no propping open), inspection frequency (monthly visual, post-storm checks), and what to do if damage occurs (contact EDGE for parts, isolate area until repaired). Document training and include as-builts in facility files.
For a membrane roof with warranty constraints, you should select a non-penetrating guardrail and require a site-specific ballast layout rather than shopping by a generic weight. Submittal is the package of drawings, specifications, and calculations used to confirm the selected guardrail system meets project requirements before installation. NIOSH data shows approximately 300 fatal and 20,000 nonfatal fall-related injuries occur annually among construction workers, underscoring the value of passive protection where feasible.
| What to Send EDGE | Format |
|---|---|
| Roof plan (showing building outline, hatch/ladder locations, roof edge) | PDF or CAD file; include scale and dimensions |
| Site photos (access points, parapets, roof conditions) | JPEG or PDF; label each photo with location |
| Building height | Text or email: "Roof elevation is X feet above grade" |
| Parapet details (if present) | Height, construction type (masonry/metal), continuity/gaps |
| Roof membrane type and age | Text: "TPO membrane, installed 2018" or similar |
| Known roof load limits (if available) | Structural drawings or roof consultant report showing psf rating |
| Required protection zones | Marked-up plan showing edges and access areas needing guardrails |
| Access point dimensions | Hatch size (e.g., 30"×36"), ladder width, curb heights |
| Toe board requirements (if any) | Yes/No; if yes, specify where and typical length |
For broader program planning resources, see EDGE’s rooftop fall protection guide.
Installation, Inspection, and Ongoing Compliance (What to Document)
Installation is not the finish line; it’s the start of your compliance record. If a freestanding guardrail is moved or reconfigured, treat it as a new installation and re-verify it against the approved layout and documentation. Correct assembly, regular inspection, and change control keep the system compliant over time and protect you during OSHA inspections or insurance audits.
Pre-install checks: Verify roof condition before placing bases. Clear debris, standing water, ice, and loose material. Confirm layout matches the approved drawing (base spacing, setbacks, corner treatments). Install pads under every base to protect the membrane and provide friction. Check that pads are the correct size and material. Damaged or missing pads void the design assumptions.
Assembly controls: Follow the vendor’s installation manual. Verify all pins, locks, or couplings are fully engaged. Measure rail height at multiple points — it must be 42 inches ±3 inches from the walking-working surface. Check midrail placement (when required). Inspect terminations and outriggers for correct assembly. Missing components or incorrect assembly can reduce strength below OSHA criteria. Take photos of completed installation for as-built records.
Inspection cadence: Routine visual checks (weekly or monthly depending on traffic). Formal inspections after severe weather (high wind, heavy snow load, ice storm), after any re-roofing work or roof repairs near the guardrail, and after reconfiguration or relocation of components. Look for displaced bases, damaged rails, loose connections, missing pins, and membrane damage under pads. Document inspections in a log. Note any deficiencies and corrective actions taken.
Change control: Moving bases or rails changes the engineered condition. If you relocate a section to make room for new HVAC equipment, the new layout may no longer match the wind/ballast design. Re-verify the configuration. If the change is substantial (new corners, longer runs, different setbacks), request updated engineering from the vendor. Document the change and update as-built drawings.
Training tie-in: Even passive systems require rules. Train workers to keep materials away from edges (falling object risk), keep gates closed after passing through, and never remove components for convenience. Gates should self-close, but workers must ensure latches engage. Teach inspection basics — what to look for, when to escalate, who to contact if damage is found. Sign-off sheets prove training occurred.
A competent person is someone who can identify existing and predictable hazards and has authority to take prompt corrective action, per OSHA definitions. Designate a competent person for guardrail inspections. Insufficient planning contributes to falls; NIOSH emphasizes documented planning improves use of fall protection. For additional compliance documentation support, see EDGE’s safety checklist.
| Item to Check | Frequency | Pass Criteria | Action If Failed |
|---|---|---|---|
| Base position and alignment | Monthly, post-storm | Bases in correct locations per layout; no displacement | Reposition bases; verify pads intact; re-inspect |
| Pad condition | Monthly, post-storm | Pads under every base; no tears, compression, or displacement | Replace damaged pads; clean debris from under pads |
| Rail height | After installation, annual | 42 inches ±3 inches from walking surface | Adjust base or rail; verify components correct per manual |
| Pin/lock engagement | Monthly | All pins/locks fully engaged; no missing hardware | Replace missing pins; check for damage; re-engage locks |
| Gate operation | Weekly (high-traffic access), monthly (low-traffic) | Gate self-closes and latches automatically; no binding | Lubricate hinges; adjust latch; replace if damaged |
| Membrane condition under pads | Annual, after roof work | No punctures, tears, abrasion, or compression damage | Repair membrane per manufacturer; notify roof warranty holder |
| Corner/termination outriggers | Monthly, post-storm | Outriggers in place and secure; no displacement | Reposition; verify ballast distribution per layout |
| Toe boards (if installed) | Monthly | Secure attachment; no gaps >1 inch; no damage | Replace or reattach toe boards; verify brackets tight |
| Overall system stability | Post-storm, after snow melt | No tipping, racking, or excessive movement under manual test | Isolate area; contact vendor for engineering review; do not use until verified |
Frequently Asked Questions
Does OSHA specify a required ballast weight for non-penetrating roof guardrails?
No — OSHA does not publish a required ballast weight for freestanding roof guardrails. OSHA specifies guardrail height and strength criteria (42 inches ±3 inches, 200-lb top rail load capacity), while ballast is determined by site-specific engineering and the selected guardrail model. Wind loads, building height, exposure category, roof slope, and layout configuration all drive ballast requirements. The engineering uses standards like ASCE 7 to calculate those forces, then designs a base layout and counterweight that resists sliding and overturning. Vendors who quote a single ballast number without asking about your site are guessing. Ask for a wind design basis and site-specific layout drawing. OSHA 1910.29 and OSHA 1926.502 provide the performance requirements the system must meet.
What is the OSHA height requirement for a roof guardrail system?
OSHA generally requires a 42-inch top rail height (plus or minus 3 inches), with intermediate protection such as a midrail when there’s no parapet wall. The top rail must be 42 inches above the walking-working surface. If a parapet wall at least 21 inches high exists, it can serve as part of the intermediate protection and the midrail requirement changes. When no parapet is present, you need a midrail, screen, or mesh between the walking surface and the top rail, with openings no larger than 19 inches. These requirements appear in both OSHA 1910.29 (general industry) and OSHA 1926.502 (construction). Measure height from the actual walking surface workers will use — the roof membrane, not the structural deck below.
How does a non-penetrating guardrail stay in place during wind?
It stays in place through counterweight (ballast), roof-interface friction/pads, and a base layout designed to resist sliding and overturning under the site’s wind conditions. Wind pushes on the rail and creates an overturning moment about the base. Ballast on the opposite side counters that moment. The base footprint and friction with the roof resist sliding. Corners and ends may require outriggers or extended base feet to maintain stability because they see higher wind pressures and different load paths. The correct ballast and layout are verified through third-party testing of the standard configuration or project-specific engineering calculations using ASCE 7 wind loads for your building. If your roof has corners, access gates, toe boards, or high-wind exposure, the ballast layout may differ from a simple straight-run perimeter. Roof conditions (wet vs. dry, slope, membrane type) also affect friction assumptions. Always request the vendor’s design basis and site-specific layout drawing.
Do non-penetrating roof guardrails void roof warranties?
Non-penetrating guardrails are often chosen specifically to protect roof warranties because they avoid membrane penetrations, but you should still confirm the roof manufacturer’s requirements and document the method. Most roof warranties are void if you drill through the membrane without approval. Freestanding guardrails with protective pads avoid that risk. Some warranties have other conditions — notification to the manufacturer, use of approved products, or limits on roof loading. Contact your roof manufacturer or roofing contractor before installing any fall protection system. Provide them with the guardrail specs (base weight, pad material, layout) and request written confirmation that the system won’t void coverage. Include that confirmation in your project file. Pads protect the membrane from abrasion and distribute load, but you still need to verify roof capacity. Non-penetrating doesn’t mean “no roof impact” — it means “no fastener penetrations,” so roof capacity and point loads still matter.
When do I need toe boards on a roof guardrail?
Use toe boards when there’s a risk of tools or materials falling to workers or areas below, and make sure the toe board meets OSHA’s minimum criteria. OSHA 1910.29(k) specifies toe boards must be at least 3.5 inches in vertical height and withstand at least 50 pounds applied downward or outward. Install toe boards when workers stage tools, materials, or equipment near edges and there’s a chance those items could be kicked or blown off. Ground-level personnel, parking areas, or pedestrian walkways below the roof create falling object risk. Adding toe boards increases wind sail area — a 4-inch solid toe board along 100 feet of rail can significantly increase wind forces on the system. Include toe boards in the vendor’s wind/ballast design basis or you may discover after installation that bases aren’t heavy enough. Toe boards should be part of the initial quote and layout, not an afterthought.
What documents should I require before buying a freestanding roof guardrail?
Require a site-specific layout drawing, wind design basis, roof load confirmation approach, and installation/inspection documentation — otherwise you’re being asked to assume the engineering risk. The layout drawing shows base spacing, corner treatments, gate locations, and wind zones. The wind design basis states the code used (ASCE 7 edition), wind speed, exposure category, and building height. Roof load documentation confirms the system weight and footprint are within your roof’s capacity (or specifies load-distributing pads). Installation manual and inspection checklist define correct assembly and ongoing maintenance. OSHA compliance statement confirms the system meets height and strength criteria per 1910.29 or 1926.502. Some jurisdictions or contracts require a PE stamp (professional engineer seal) — ask whether one is needed and whether the vendor provides it. Warranty coordination note documents that no roof penetrations are required and specifies pad requirements. Closeout deliverables include as-built layout, training sign-off, and maintenance plan. If a vendor won’t provide these, walk away — you’re being asked to guess ballast and accept liability.
Is a warning line system a substitute for guardrails?
Sometimes, but only for specific work scenarios and distances from the roof edge; warning lines are not a universal substitute for guardrails. In general industry, OSHA allows designated areas on low-slope roofs (slope of 4 in 12 or less) where workers can work without additional fall protection if the work is at least 6 feet from the roof edge, and work within 15 feet of the edge is both infrequent and temporary. The warning line must be at least 6 feet from the roof edge for work that is both temporary and infrequent, or at least 15 feet for other work. Workers must stay within the designated area while work is underway (OSHA 1910.28(b)(13) and 1910.29(d)). Warning lines must meet specific height and strength criteria. This approach is permitted only for certain tasks under OSHA 1910 and 1926 — verify that your work scope qualifies. Warning lines require strict policy enforcement. If workers routinely cross the line, the system fails. Guardrails provide passive protection and don’t rely on worker compliance, so they’re preferred when feasible. Use warning lines only when your job scope, roof geometry, and training program align with OSHA designated area requirements. For spacing details, see EDGE’s guide to warning line system spacing.
Conclusion
Ballast weight is not a one-size-fits-all number — it’s a site-specific engineering output. OSHA tells you the guardrail must be 42 inches tall and resist 200 pounds at the top rail. Engineering tells you how much ballast and what base layout your roof, wind, and configuration require. Corners, access gates, toe boards, roof load limits, and setbacks all change the answer. If a vendor quotes you a ballast number without asking about those inputs, you’re shopping blind.
The safe path: Define your roof constraints (membrane type, load capacity, warranty rules). Choose a system style that fits (freestanding, parapet clamp, standing seam clamp, or warning line where permitted). Request a vendor submittal package with a wind design basis, site-specific layout drawing, roof load check, OSHA compliance statement, installation manual, and inspection plan. Document everything. Train your team. Inspect after weather events. Treat reconfigurations as new installations.
EDGE Fall Protection provides the engineered documentation, layout drawings, and compliance support that facility and EHS leaders need to stop guessing and start buying with confidence. Send your roof plan and access point locations to EDGE Fall Protection for a documented, site-specific non-penetrating guardrail layout. We’ll help you select the right system style (freestanding, parapet clamp, or metal roof clamp) and provide the drawings and documentation you need — so you don’t guess ballast weight. Request an engineered quote today.
References
- OSHA 1910.29 - Fall protection systems and falling object protection — Guardrail height, strength, midrail, and toe board criteria for general industry.
- OSHA 1926.502 - Fall protection systems criteria and practices — Construction guardrail requirements including 42-inch top rail and 200-lb strength.
- NIOSH - The Problem of Falls from Elevation in Construction — Falls from elevation ~81% of fatal slips/trips/falls in 2022; planning correlates with fall protection usage.
- EHS Leaders - OSHA’s Most-Cited Standards List — FY 2025 fall protection violations (5,914) to reinforce compliance urgency.
- U.S. Bureau of Labor Statistics - National Census of Fatal Occupational Injuries in 2024 — February 19, 2026. Construction and extraction workers experienced 1,032 fatalities in 2024, including 370 from falls, slips, and trips.